Tuesday, December 27, 2011

Daring Bakers - December 2011: Sourdough Bread

Courtesy of King Arthur Flour
Our Daring Bakers Host for December 2011 was Jessica of My Recipe Project and she showed us how fun it is to create Sour Dough bread in our own kitchens! She provided us with Sour Dough recipes from Bread Matters by AndrewWhitley as well as delicious recipes to use our Sour Dough bread in from Tonia George’s Things on Toast and Canteen’s Great British Food!

Let me first say that I love sourdough bread.  Anytime I see a grilled toasty sandwich on sourdough, I'll take it!  As for the sourdough making process, I can't say it was an enjoyable process.  Even the science nerd in me was kind of grossed out.

unlike regular bread, sourdough bread is made from a starter, and has no yeast.  No yeast?  Well, you ask, how does it rise?  The starter is a mass of fermented water and flour.  The recipe Jessica provided consisted of flour and water left to ferment in a covered container for several days.  Periodically, you feed the starter with more flour and water. 

All starter well in the beginning, I could see it starting to bubble away on the counter, and I dutifully fed it each day.  However, by day 4, it had stopped bubbling, and a layer of greyish liquid had formed on top.  Not sure what to do, I proceeded with the recipe, hoping it would still do something.  After the final feeding/refreshing, I was ready to bake.  It looked like the thing that ate Manhattan, and stank to high heaven!  But, reading other DBers' posting who said that it would be an extremely wet and loose dough, I kept going.  I don't have any pictures of the blob because it would have dripped off the counter onto the flour if I'd tried to take pictures.

I waited for it to proof and rise.  And waited...and waited... and waited.  Nothing.  I hoped it would have some oven spring.  Nope.  My final project was flat, dense, greyish in color, and not at all edible.


Monday, October 31, 2011

Happy Halloween!


When you were a kid, what candy in the trick or treat bag made your day?  For me, it was chocolate, of course. And it couldn't be just any chocolate, either.  It had to be the good stuff - the name brand chocolate.  You name it..Snickers, Reese's, and of course, Butterfinger.

We don't have any trick or treaters of our own yet, and we're the type to eat any candy we buy for the trick or treaters a week before Halloween.  So,...we typically don't buy any (until after Halloween, that is).  But, the past few weeks, I've been seeing pins on Pinterest for homemade butterfinger candy bars.  One recipe has lots of ingredients, and the other so simple you don't believe it could possibly work.

The science geek in me really wanted to see how candy corn plus peanut butter equaled butterfinger bars!  But, yes, ladies and gentlemen, it works.  And, if I do say so myself, the homemade version is better than the original.  (But just as bad for you, LOL)

The "real" butterfinger is on the right.  Doppelganger on the left.

Homemade Butterfingers
16 oz candy corn
16 oz peanut butter
Chocolate coating (Candy Melts, Chocolate Bark, whatever you please)

Microwave the candy corn and peanut butter in a glass bowl until it starts to melt.  Stir.  Continue melting and stirring.  The candy corn will not melt as easily as the peanut butter, but you shouldn't need more than a minute and a half of microwaving total.  Keep stirring until the candy corn is completely melted and combined with the peanut butter.  The mixture will start out pretty grainy, and you'll think you're going to have to toss your bowl out. But, pretty soon, it comes together into a smooth ball, and very little candy sticks to the bowl. You can now press the mixture into a pan or candy molds to set, or scoop them into bonbons.  Let cool completely before covering in your melted candy coating.

I used a 5 oz bag of candy corn and about a half cup of peanut butter and got 5 "fun size" candy bars plus three small bonbons.  The homemade butterfingers are the size that fun size candy bars used to be when I was a kid (Don't you think they've gotten smaller?), had a stronger flavor, but had a softer texture.  You still get the crunchiness, but they don't get stuck in your teeth as much as the original. 


Thursday, October 27, 2011

Daring Baker October 2011 - Povitica

Before I start, this wonderful sweet bread, spelled povitica is pronounced po-vi-teet-sa.


The Daring Baker’s October 2011 challenge was Povitica, hosted by Jenni of The Gingered Whisk. Povitica is a traditional Eastern European Dessert Bread that is as lovely to look at as it is to eat!

And, best of all, not too hard to make.  And once you taste the povitica, you have to learn t make it.  These bad boys go for $27 apiece online!  The hardest part was making and rolling out the dough, and this one was pretty easy to work with.  And pretty tasty to eat.  This was one of those things you have to sneak a taste of everytime you pass through the kitchen.  It didn't make it through the weekend.

Here's the recipe that Jenni put together. NOTE: The amounts referred to in the instructions do not match the recipe amounts.  Jenni's original recipe made FOUR loaves!

Povitica (Makes one loaf 1.25 lbs/565 grams)


To activate the Yeast:
½ Teaspoon (2½ ml/2¼ gm) Sugar
¼ Teaspoon (1¼ ml/¾ gm) All-Purpose (Plain) Flour
2 Tablespoons (30 ml) Warm Water
1½ Teaspoons (7½ ml/3½ gm/0.125 oz/½ sachet) Dry Yeast


1. In a small bowl, stir 2 teaspoons sugar, 1 teaspoon flour, and the yeast into ½ cup warm water and cover with plastic wrap.
2. Allow to stand for 5 minutes


Dough:
½ Cup (120 ml) Whole Milk
3 Tablespoons (45 ml/43 gm/1½ oz) Sugar
¾ Teaspoon (3¾ ml/9 gm/0.17 oz) Table Salt
1 Large Egg
1 tablespoon (30 ml/30 gm/¼ stick/1 oz) Unsalted Butter, melted
2 cups (480 ml/280 gm/10 oz/0.62 lb) All-Purpose Flour, measure first then sift, divided
To Make the Dough:


3. In a medium saucepan, heat the milk up to just below boiling (about 180°F/82°C), stirring constantly so that a film does not form on the top of the milk. You want it hot enough to scald you, but not boiling. Allow to cool slightly, until it is about 110°F/43°C.
4. In a large bowl, mix the scalded milk, ¾ cup (180 gm/170 gm/6 oz) sugar, and the salt until combined.
5. Add the beaten eggs, yeast mixture, melted butter, and 2 cups (480 ml/280 gm/10 oz) of flour.
6. Blend thoroughly and slowly add remaining flour, mixing well until the dough starts to clean the bowl.
7. Turn dough out onto floured surface and knead, gradually adding flour a little at a time, until smooth and does not stick.
8. Divide the dough into 4 equal pieces (they will each weight about 1.25 pounds/565 grams)

9. Place dough in 4 lightly oiled bowls, cover loosely with a layer of plastic wrap and then a kitchen towel and let rise an hour and a half in a warm place, until doubled in size.


Filling Ingredients (enough filling for one loaf)
1¾ Cups (420 ml/280 gm/10 oz) Ground English Walnuts
¼ Cup (60 ml) Whole Milk
¼ Cup (60 ml/58 gm/½ stick/2 oz) Unsalted Butter
1 Egg Yolk From A Large Egg, Beaten
¼ Teaspoon (1¼ ml) Pure Vanilla Extract
½ Cup (120 ml/115 gm/4 oz) Sugar
¼ Teaspoon (1¼ ml/1 gm) Unsweetened Cocoa Powder
¼ Teaspoon (1¼ ml/¾ gm) Cinnamon

To Make the Filling
10. In a large bowl mix together the ground walnuts, sugar, cinnamon and cocoa.
11. Heat the milk and butter to boiling.
12. Pour the liquid over the nut/sugar mixture.
13. Add the eggs and vanilla and mix thoroughly.
14. Allow to stand at room temperature until ready to be spread on the dough.
15. If the mixture thickens, add a small amount of warm milk.

To Roll and Assemble the Dough:


16. Spread a clean sheet or cloth over your entire table so that it is covered.
17. Sprinkle with a couple of tablespoons to a handful of flour (use flour sparingly)
18. Place the dough on the sheet and roll the dough out with a rolling pin, starting in the middle and working your way out, until it measures roughly 10-12 inches (25½ cm by 30½ cm) in diameter.
19. Spoon 1 to 1.5 teaspoons (5ml to 7 ½ ml/4 gm to 7 gm) of melted butter on top.
20. Using the tops of your hands, stretch dough out from the center until the dough is thin and uniformly opaque. You can also use your rolling pin, if you prefer.
21. As you work, continually pick up the dough from the table, not only to help in stretching it out, but also to make sure that it isn’t sticking.
22. When you think it the dough is thin enough, try to get it a little thinner. It should be so thin that you can see the color and perhaps the pattern of the sheet underneath.
23. Spoon filling (see below for recipe) evenly over dough until covered.
24. Lift the edge of the cloth and gently roll the dough like a jelly roll.
25. Once the dough is rolled up into a rope, gently lift it up and place it into a greased loaf pan in the shape of a “U”, with the ends meeting in the middle. You want to coil the dough around itself, as this will give the dough its characteristic look when sliced.
27. Brush the top of loaf with a mixture of ½ cup (120 ml) of cold STRONG coffee and 2 tablespoons (30ml/28 gm/1 oz) of sugar. If you prefer, you can also use egg whites in place of this.
28. Cover pan lightly will plastic wrap and allow to rest for approximately 15 minutes.
29. Preheat oven to moderate 350°F/180°C/gas mark 4.
30. Remove plastic wrap from dough and place into the preheated oven and bake for approximately 15 minutes.
31. Turn down the oven temperature to slow 300°F/150°C/gas mark 2 and bake for an additional 45 minutes, or until done.
32. Remove bread from oven and brush with melted butter.
33. Check the bread at 30 minutes to ensure that the bread is not getting too brown. You may cover the loaves with a sheet of aluminum foil if you need to.
34. Remove from the oven and allow to cool on a wire rack for 20-30 minutes, still in the bread pan. Remember, the bread weighs about 2.5 and it needs to be able to hold its own weight, which is difficult when still warm and fresh out of the oven. Allowing it to cool in the pan helps the loaf to hold its shape.

35. It is recommended that the best way to cut Povitica loaves into slices is by turning the loaf upside down and slicing with a serrated knife.


The money shot!

Sunday, October 23, 2011

Taste of Atlanta 2011

Have you been to the Taste of Atlanta?  If not, you need to go next year! 

The Taste of Atlanta is our favorite fall food festival.  It's a weekend full of fantastic food -- more than you can even think about eating in a  single afternoon.  This year was the tenth anniversary, and over 80 restaurants were featured.  With your general admission ticket, you receive 10 "taste tickets" which you can redeem at the different booths for samples of their yum yum yummies.  To get the most of our taste tickets, the Artist and I always go in with a plan:

1.  Scope out the entire festival.  Who's got the good stuff, and how many tickets is it? 
This step is crucial, it's way to easy to use up all of your tickets before you even get through the first block!  I mean, really!  Sublime Doughnuts and Jim 'n Nick's BBQ met us at the entrance gate!

2.  Have a tasting strategy.
We usually share things that are more than a bite or two.  That way, we don't both fork over 3 or 4 tickets for the same thing.  Also, it's hard to do, but don't load up on desserts first.  I speak this one from experience.  Last year, I was stuffed...uncomfortably so, and way before I was ready to go home!

3.  Plan to buy more taste tickets!
Because really, 10 tickets is not going to be enough

Seafood Bisque


Cheesesteak

Orange Dream Doughnut

Soft Pretzel w/Beer Cheese Dip

Lamb Slider

Banh Mi

Mississippi Delta Tamale

Caramel Apple Bread Pudding


Orange Kissed Frozen Yogurt


Lemon Pepper Wings and Fries


Even going in with a plan, there's always something you want to taste but don't.  Ri Ra's line for fish and chips stayed a block long for the entire afternoon!  I wanted to try the arroncini, but 1 tiny rice ball wasn't really worth 2 tickets, was it?

Sunday, September 11, 2011

Goodbye Summer, Hello Fall!

It's that time of year....it's still hot as Hades, but I still am optimistically believing that I can "feel" fall in the air.  It seems this year that Labor Day was literally the switch for fall, it's been in the low 70s all week since, while just two days before Labor Day, it was 95!

As the final hurrah to summer, I made ice cream.  Sort of.  As much as ice cream can be made without an ice cream maker.  And as much as ice cream can be made in a plastic freezer bag.  I've seen this several times before, most often in family oriented magazines under "Things to Keep the Kids Busy".  No kids here, just a science nerd and foodie who is still fascinated by the butter we made in a jar in the 2nd grade.  I followed this recipe from 2 little hooligans.


It turned out to be a runny soft-servish consistency.  At this point, ice cream maker ice cream would also be soft and you'd put it in the freezer to finish up.  I put this in the freezer and it got too hard and lost any creaminess it started out with.  Not bad in a pinch, but the stuff from the store works for me.


The same day, to usher in fall, I made white chocolate pumpkin scones.  I'm usually not a scone girl.  For me, I classify them as snacks/dessert, and my baked snacks/dessert should be sweet.  All of the scones I've had have been of the Starbucks/Panera variety, which means dry triangular biscuits with something either in them or on them.  These however, were AWESOME.  Rich, buttery, flaky.  I also was finally able to understand what the descriptor "tender" means in relation to baked goods.

I doubled the recipe from Small Batch Baking for Chocolate Lovers, and skipped the glaze.   I only skipped the glaze because I only had a handful of white chips, and they went inside the scones.


Changing gears, today is the 10th anniversary of the September 11 attacks.  Do you remember where you were?  How has your life changed? 

9-11 Remembrance – FamilyFreshCooking.com

Tuesday, June 28, 2011

Take-out Fake-out: Red Thai Curry


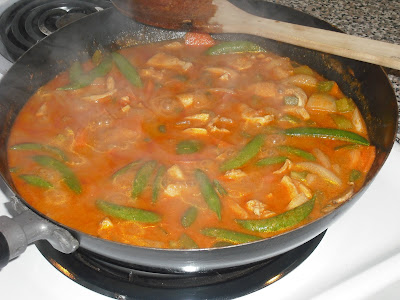
Here's a first at the Great Cakescapade: A RECIPE! And not only a recipe, but a take-out favorite, Thai Curry. I like red curry, but would never in a million years have thought it would be so easy to make at home. A few weeks ago, I was visiting my mom, and snatched a couple of magazines to read on the plane back home. Fine Cooking had a spread on DIY Thai curry, including a matrix to mix and match your own custom curry that can be found here.
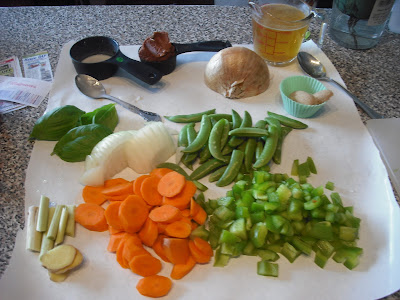
This recipe is totally easy and doable, with very little in the way of 'odd' ingredients. I think I spent more time chopping than cooking.

Red Chicken Curry (adapted from Fine Cooking Magazine)
*Curry Base
14 oz can coconut milk
1/4 cup red curry paste
1 cup chicken broth
*Aromatics
3 slices of ginger
1 stalk lemongrass, cut into 4-inch pieces and bruised (I hit it with a meat mallet a couple times)
*Protein
1 lb. boneless, skinless chicken breast, thinly sliced
*Other stuff
2 TBS brown sugar
1 tsp fish sauce (I realized at the last minute we didn't have any. I left it out completely and couldn't tell you it was missing)
*Veggies
3 cups chopped vegetables : I used carrots, onions, bell peppers, and sugar snap peas


To make the curry base, simmer 1/2 a cup of the coconut milk until it is thickened and reduced by half. Whisk in the curry paste, cook 1 minute, then whisk in the remaining coconut milk and chicken broth.


Add the ginger, lemongrass, and brown sugar. Stir to dissolve the brown sugar, then start adding the remaining ingredients according to cooking time. The chicken went in first, then the carrots, peppers, and onion. Snap peas went in last, as they don't take too long. Let the whole wok simmer until everything is done! Serve over rice, and supper is ready.


The Fine Cooking Magazine matrix is easy to follow and really lets you realize how customizable the recipe is. The Artist, who had never before had Thai curry, really enjoyed it, and so did I.

Monday, June 27, 2011

Opa! Daring Baker Challenge - June 2011

Erica of Erica’s Edibles was our host for the Daring Baker’s June challenge. Erica challenged us to be truly DARING by making homemade phyllo dough and then to use that homemade dough to make Baklava.

Homemade phyllo? Now, that's a challenge. Challenge number one was when the recipe said to knead by hand for 20 minutes (the alternative when you don't own a stand mixer). I was resourceful and had my bread machine do the kneading. The dough was a bit sticky, but was wonderfully smooth and silky -- much nicer than it looks when I make actual bread!

After letting the dough rest for a couple of hours, I was ready to rock and roll. I thought getting the phyllo sheets paper thin would be no big deal -- I roll fondant and gumpaste that thin for flowers. This just was not the same. It seemed at some points that, while the dough didn't seem thin enough, the rolling pin wasn't doing anything, and I had to put my weight into it. As you can see in the picture below, I need to invest in a cute, frilly apron.

Eventually, I was tired of rolling phyllo dough. But finally, I had about 12 thin enough sheets of phyllo, which I was able to cut down to 18 sheets the size of my small baking dish. After the dough rolling, assembling the baklava was simple: layers of phyllo brushed with melted butter, alternating with layers of finely chopped nuts and cinnamon.

I knew going into the challenge that I was not a big baklava fan. I think if I made it again, I would go with my usual store bought whole wheat phyllo, and use something other than honey in the soaking syrup.

Thanks for the challenge (and upper body workout), Erica! Stay tuned for July's challenge.


Thursday, June 9, 2011

Not your regular graduation cake


My baby sister's all grown up! This past weekend, L graduated from high school. I was 13 when she was born, and still remember life before she was around. I hadn't had the opportunity to share the perks of my cake baking hobby with my mom and sister, and decided to whip up something for the occasion.


Harder than it sounds because L is a notoriously picky eater.


Me:What kind of cake do you want?


Crickets...It took her forever to decide.


L:White cake with vanilla frosting.


Seriously? White on white?


L: Well, you can color the frosting.


Me: Alrighty, then. What kind of design do you want?


L is a budding artist, and of course, had to come up with something extreme. This is the description she sent via Facebook:


"Can you just make me a BAD-ASS manticore cake with vicious teeth in a creepy smile, yellow cat-like eyes with black pupils, a dirty blond main thats really messy and flops around, human-like paws, blueish purple hind-quarters with digit grade back legs, deep blus scorpion tail dripping poison, and lightning bolt stripes of electric blue. Oh, and can you make him a hipster?"


Me: WTF???


So...yeah....what I decided to do was merge our respective hobbies in the middle. We split a box of fondant and each created a manticore (which, BTW, is a chimera like creature). Best manticore would go on the cake. And MINE WENT ON THE CAKE!


And quite the tasty cake, too. An ice cream cake! Chocolate cake (I talked her into living a little), cookies and creme ice cream, and white frosting. I need to plan the ice cream cake process a little better; it started to melt and wouldn't firm up without an overnight freeze. But, I think it turned out pretty good, despite the drips and bulges, considering I frosted it with a plastic knife! The plastic knife was because I wasn't sure if my cake spatulas would make it past the TSA screeners.


Congratulations, little sister!


Sunday, May 22, 2011

Small Batch Baking

Sometimes, baking is not just to quench the craving of my sweet tooth. (Often, it is, but not always!). Truth be told, I just really enjoy the act of baking. Feeling the mixer buzz in my hand, or turning the bowl as I mix ingredients, is strangely soothing.

And, when it's not the sugar high that I seek, a cookie recipe that yields 4 dozen is just way to much! So, when I saw Debbie Maugan's two cookbooks centered around baking for two -- say, 6 cupcakes or a dozen cookies, I was game.

This weekend, I tried out two recipe from Debbie's Small Batch Baking for Chocolate Lovers: Chocolate Sandwich Cookies, and Chocolate Chip Cookies.

The chocolate sandwich cookies were, of course, supposed to compete with those famously addictive Oreo cookies. This recipe will not replace the Oreos in my shopping cart, but the Artist and I both thought they were quite tasty. I tweaked the recipe to use chocolate that I had on hand, and used milk chocolate instead of the semi-sweet specified. I think the darker chocolate would calm the overly sweet taste of the filling. Will have to try these again...


Who doesn't love chocolate chip cookies? This recipe was great. They made a dozen little cookies full of chocolate and nuts that would give the $20/pound cookies from a local gourmet shop a run for their money! A plus was that using my cookie scoop, I got exactly one dozen cookies rather than the 8 predicted by the recipe. Too many chips? Chewy, crispy, chocolaty, nutty, with the addition of creme bouquet flavoring rather than regular old vanilla extract, these cookies were great!


This book and I will be getting to know each other very well. Debbie features cakes, pies, brownies, and more (even a chocolate cocktail or two). I'll probably eventually try them all!More to come....


Wednesday, April 27, 2011

Daring Baker Challenge - April 2011


What an interesting challenge this month! Maple mousse in an edible container.


The April 2011 Daring Bakers’ challenge was hosted by Evelyne of the blog Cheap Ethnic Eatz. Evelyne chose to challenge everyone to make a maple mousse in an edible container. Prizes are being awarded to the most creative edible container and filling, so vote on your favorite from April 27th to May 27th at http://thedaringkitchen.com/!


Hint, hint...vote for me!


Some of the suggestions for edible containers included weaving bacon strips together and baking into little cups, or nut tartlet shells. Obviously, I wanted to take it in my own direction. But what?


I was inspired one day as I passed by my mega shelf of cake supplies: CANDY BARS! I thought they would fit the bill: handheld, bite sized, and definitely contained. Trying to think of what kind of candy bar, I sort of combined the idea of a Snickers bar, and Maple Nut Goodies.


My candy bars were the maple mousse, toasted pecans, and caramel, all covered in white chocolate. I must say, while the mousse was not something I could eat by itself, the flavors in the candy bars went together quite nicely! I was pleased, as was The Artist.

Monday, March 28, 2011

Daring Baker Challenge - March 2011

The March 2011 Daring Baker’s Challenge was hosted by Ria of Ria’s Collection and Jamie of Life’s a Feast. Ria and Jamie challenged The Daring Bakers to bake a yeasted Meringue Coffee Cake. When I found out the challenge, I was curious and intrigued. Ria and Jamie challenged us to fill the coffee cake with meringue and whatever filling of choice. I'd never made meringue before, as I never really have cared for it. And what to pair it with? I thought about a lemon curd, as a twist on lemon meringue. Then, I found an old Cooking Light recipe for triple berry curd, and decided to go with that. Another idea I considered was Nutella and orange zest, which I well try on another day. My first try at meringue was a success; it whipped up with no problem. But, when spreading it on my dough, I overfilled it, and couldn't roll it up. I wound up sort of shaping it into a circle and scooped it into a round cake pan. It was pretty and swirly when done, but not the vision I had originally. But, isn't that the story of my kitchen adventures? In short, I would make the yeasted coffee cake again, minus the meringue. Other Daring Bakers described it as baking to a nougaty finish, but mine didn't do that. It just took away from the berry curd which was absolutely awesome on its own.

Search This Blog