Tuesday, June 28, 2011

Take-out Fake-out: Red Thai Curry


Here's a first at the Great Cakescapade: A RECIPE! And not only a recipe, but a take-out favorite, Thai Curry. I like red curry, but would never in a million years have thought it would be so easy to make at home. A few weeks ago, I was visiting my mom, and snatched a couple of magazines to read on the plane back home. Fine Cooking had a spread on DIY Thai curry, including a matrix to mix and match your own custom curry that can be found here.
This recipe is totally easy and doable, with very little in the way of 'odd' ingredients. I think I spent more time chopping than cooking.

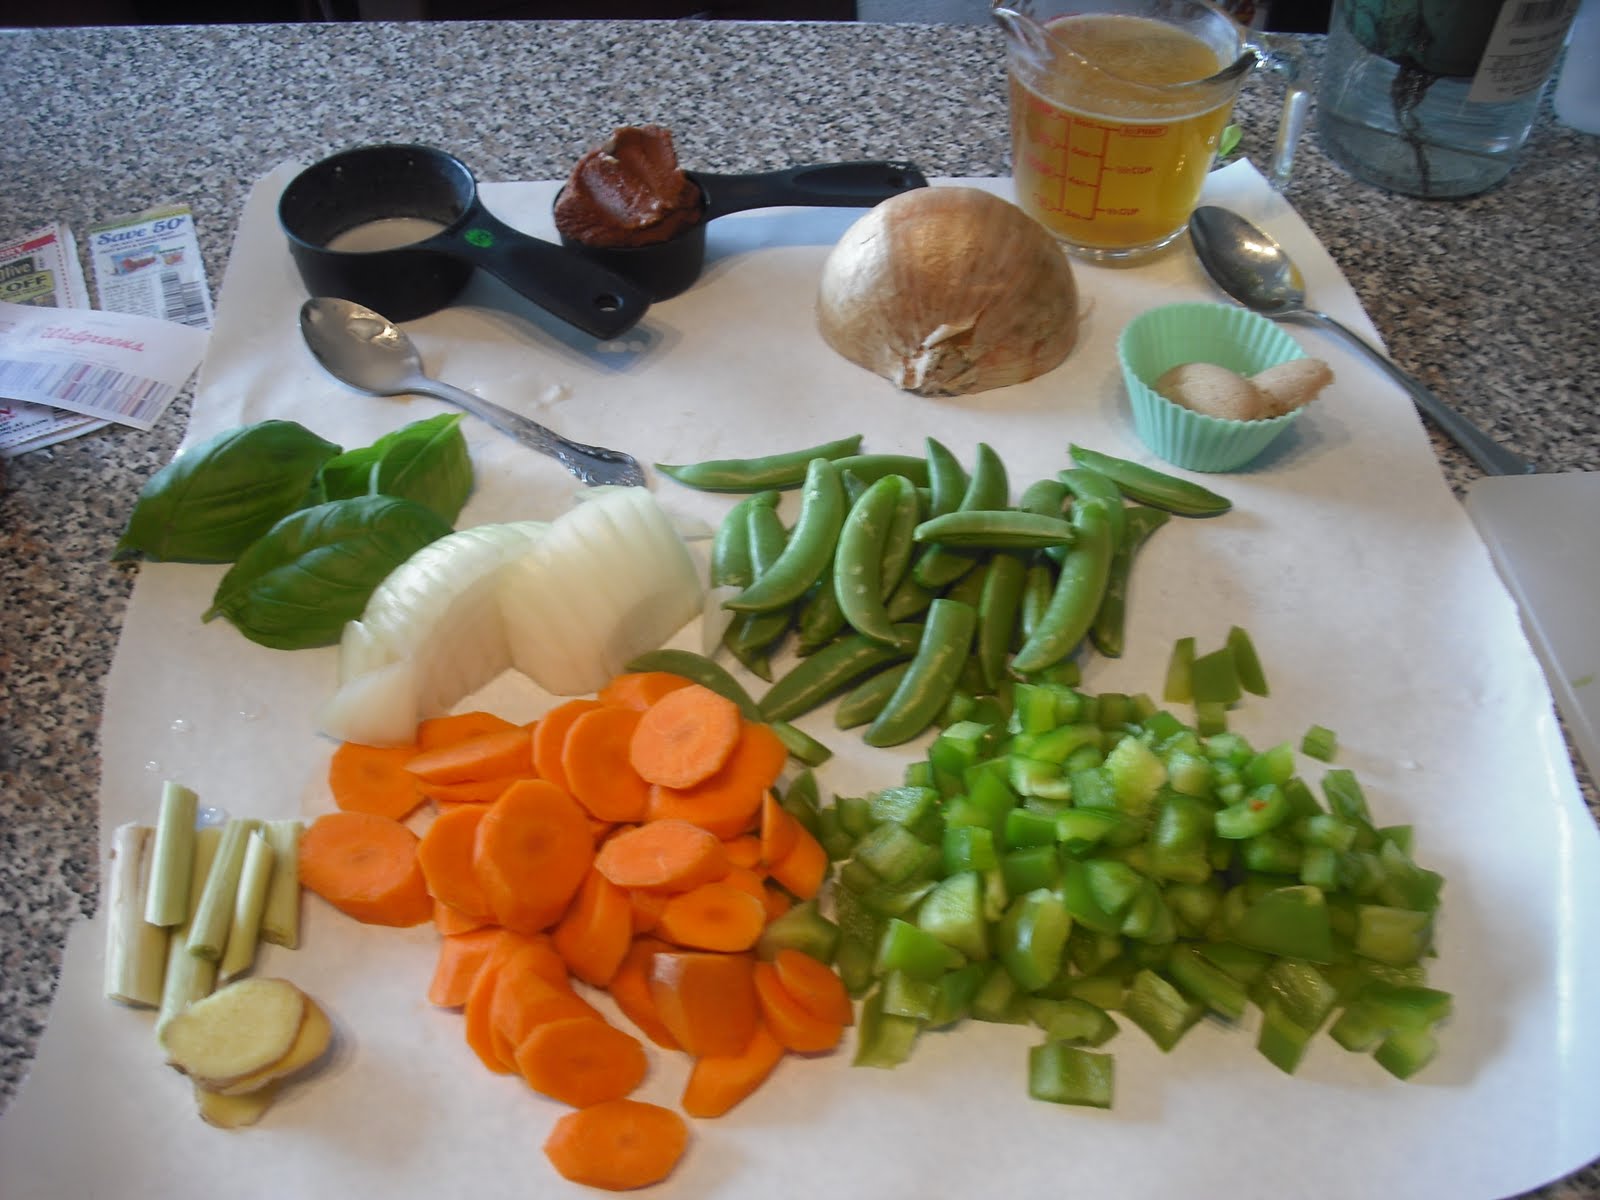
Red Chicken Curry (adapted from Fine Cooking Magazine)
*Curry Base
14 oz can coconut milk
1/4 cup red curry paste
1 cup chicken broth
*Aromatics
3 slices of ginger
1 stalk lemongrass, cut into 4-inch pieces and bruised (I hit it with a meat mallet a couple times)
*Protein
1 lb. boneless, skinless chicken breast, thinly sliced
*Other stuff
2 TBS brown sugar
1 tsp fish sauce (I realized at the last minute we didn't have any. I left it out completely and couldn't tell you it was missing)
*Veggies
3 cups chopped vegetables : I used carrots, onions, bell peppers, and sugar snap peas


To make the curry base, simmer 1/2 a cup of the coconut milk until it is thickened and reduced by half. Whisk in the curry paste, cook 1 minute, then whisk in the remaining coconut milk and chicken broth.


Add the ginger, lemongrass, and brown sugar. Stir to dissolve the brown sugar, then start adding the remaining ingredients according to cooking time. The chicken went in first, then the carrots, peppers, and onion. Snap peas went in last, as they don't take too long. Let the whole wok simmer until everything is done! Serve over rice, and supper is ready.


The Fine Cooking Magazine matrix is easy to follow and really lets you realize how customizable the recipe is. The Artist, who had never before had Thai curry, really enjoyed it, and so did I.

Monday, June 27, 2011

Opa! Daring Baker Challenge - June 2011

Erica of Erica’s Edibles was our host for the Daring Baker’s June challenge. Erica challenged us to be truly DARING by making homemade phyllo dough and then to use that homemade dough to make Baklava.

Homemade phyllo? Now, that's a challenge. Challenge number one was when the recipe said to knead by hand for 20 minutes (the alternative when you don't own a stand mixer). I was resourceful and had my bread machine do the kneading. The dough was a bit sticky, but was wonderfully smooth and silky -- much nicer than it looks when I make actual bread!

After letting the dough rest for a couple of hours, I was ready to rock and roll. I thought getting the phyllo sheets paper thin would be no big deal -- I roll fondant and gumpaste that thin for flowers. This just was not the same. It seemed at some points that, while the dough didn't seem thin enough, the rolling pin wasn't doing anything, and I had to put my weight into it. As you can see in the picture below, I need to invest in a cute, frilly apron.

Eventually, I was tired of rolling phyllo dough. But finally, I had about 12 thin enough sheets of phyllo, which I was able to cut down to 18 sheets the size of my small baking dish. After the dough rolling, assembling the baklava was simple: layers of phyllo brushed with melted butter, alternating with layers of finely chopped nuts and cinnamon.

I knew going into the challenge that I was not a big baklava fan. I think if I made it again, I would go with my usual store bought whole wheat phyllo, and use something other than honey in the soaking syrup.

Thanks for the challenge (and upper body workout), Erica! Stay tuned for July's challenge.


Thursday, June 9, 2011

Not your regular graduation cake


My baby sister's all grown up! This past weekend, L graduated from high school. I was 13 when she was born, and still remember life before she was around. I hadn't had the opportunity to share the perks of my cake baking hobby with my mom and sister, and decided to whip up something for the occasion.


Harder than it sounds because L is a notoriously picky eater.


Me:What kind of cake do you want?


Crickets...It took her forever to decide.


L:White cake with vanilla frosting.


Seriously? White on white?


L: Well, you can color the frosting.


Me: Alrighty, then. What kind of design do you want?


L is a budding artist, and of course, had to come up with something extreme. This is the description she sent via Facebook:


"Can you just make me a BAD-ASS manticore cake with vicious teeth in a creepy smile, yellow cat-like eyes with black pupils, a dirty blond main thats really messy and flops around, human-like paws, blueish purple hind-quarters with digit grade back legs, deep blus scorpion tail dripping poison, and lightning bolt stripes of electric blue. Oh, and can you make him a hipster?"


Me: WTF???


So...yeah....what I decided to do was merge our respective hobbies in the middle. We split a box of fondant and each created a manticore (which, BTW, is a chimera like creature). Best manticore would go on the cake. And MINE WENT ON THE CAKE!


And quite the tasty cake, too. An ice cream cake! Chocolate cake (I talked her into living a little), cookies and creme ice cream, and white frosting. I need to plan the ice cream cake process a little better; it started to melt and wouldn't firm up without an overnight freeze. But, I think it turned out pretty good, despite the drips and bulges, considering I frosted it with a plastic knife! The plastic knife was because I wasn't sure if my cake spatulas would make it past the TSA screeners.


Congratulations, little sister!


Search This Blog