

For personal reasons, I'm unable to post anything new right now. In an odd twist of fate, the better the personal reasons get, the longer the hiatus will be. Please pray that I can't post until next spring.
Love,
Cake Lady
Subscribe To
Thursday, July 26, 2012
Thursday, June 28, 2012
Daring Baker Challenge and a Surprise!
I'm back! I haven't baking too much, but I'm not dead...more on that topic after the challenge.
Mandy of What The Fruitcake?! came to our rescue last minute to present us with the Battenberg Cake challenge! She highlighted Mary Berry’s techniques and recipes to allow us to create this unique little cake with ease.
Before this challenge, I'd never heard of or seen a Battenburg cake. This cake was first created for the wedding of Princess Victoria to Prince Louis of Battenburg. Between that description, and the use of marzipan, I feel this cake is probably much more common in Europe than in the US.
This cute little cake typically features a 2x2 assembly of different colored/flavored cake, usually pink and yellow. I decided to expand on that idea and go big with a checkerboard pattern.
I took several liberties with this month's challenge. First, I used my favorite basic cake recipe (1-2-3-4 cake found here), I changed the design, covered it in buttercream rather than marzipan or fondant and, I changed the color scheme.

I'm thinking the color scheme might tell you where I've been the past few months! Definitely not dead, that's for sure. But, definitely not in the kitchen, either. The Artist and I are having a baby! I chose pink and blue for this cake because we don't yet know what we're having. He thinks boy, I'm undecided, but have been thinking girl the past few days. Hmmm....we'll see. And, hopefully, I'll see you next month!
Wednesday, June 6, 2012
Le Sigh...
March was a good month...I thought I was going to pay more attention to my little blog here. But, as usual, life happens. I do have a post planned for June, though. Stay tuned!
Sunday, March 18, 2012
How Does Your Garden Grow: Day 8
We're one week into the gardening project, and I'm so excited about progress so far, that I think it will be a series!
So far, the lettuce is definitely in the lead. Seedlings popped up around day 3, and while new ones are still growing in, the plants are about 2-3" tall.
The basil is also coming in pretty good. There are several little plants in the pot. I'm thinking I may need a second pot sometime down the road.

We have one lone bean stalk who made an appearance yesterday. On Friday, there was nothing. On Saturday, it had broken through the soil, but was kind of coiled. Now, on Sunday, it's about 2" high and standing tall. But,......where are the rest? I planted about 12 seeds. Will they grow, or are they duds? Time will tell, I guess.

Lastly, here are the peppers. You could almost miss them, but there are two tiny plants breaking free of the soil. I'm glad, but hope more come in. The seed package is labeled as "Carnival Mix", and I'd really like to harvest the variety of colors pictured -- green, red, purple, orange, and even ivory!

This project of mine is really bringing out the nerd in me. I seriously stare at these plants a couple of times a day, willing them to grow! And it's fascinating how much food from the store is taken for granted. For example, I know lettuce is a plant, and it grows in the ground (duh!), but I never thought about lettuce SEEDS. And I didn't really think about my packet of green bean seeds being the same white nubbins that are inside the green beans on my plate. I know it sounds kind of stupid, but these are some of those things you know in the back of your mind, but it doesn't really click. Some day down the road when we have children of our own, they will definitely be growing their own little green bean in a paper cup and digging in the dirt with me!
Stay tuned for the next episode!
So far, the lettuce is definitely in the lead. Seedlings popped up around day 3, and while new ones are still growing in, the plants are about 2-3" tall.
 |
| Growing towards the sunlight. We're going to be eating a LOT of salad. |

We have one lone bean stalk who made an appearance yesterday. On Friday, there was nothing. On Saturday, it had broken through the soil, but was kind of coiled. Now, on Sunday, it's about 2" high and standing tall. But,......where are the rest? I planted about 12 seeds. Will they grow, or are they duds? Time will tell, I guess.

Lastly, here are the peppers. You could almost miss them, but there are two tiny plants breaking free of the soil. I'm glad, but hope more come in. The seed package is labeled as "Carnival Mix", and I'd really like to harvest the variety of colors pictured -- green, red, purple, orange, and even ivory!

This project of mine is really bringing out the nerd in me. I seriously stare at these plants a couple of times a day, willing them to grow! And it's fascinating how much food from the store is taken for granted. For example, I know lettuce is a plant, and it grows in the ground (duh!), but I never thought about lettuce SEEDS. And I didn't really think about my packet of green bean seeds being the same white nubbins that are inside the green beans on my plate. I know it sounds kind of stupid, but these are some of those things you know in the back of your mind, but it doesn't really click. Some day down the road when we have children of our own, they will definitely be growing their own little green bean in a paper cup and digging in the dirt with me!
Stay tuned for the next episode!
Tuesday, March 13, 2012
How Does Your Garden Grow?
I guess you can call me Farmer Cake Lady. The warmer temperatures and ridiculoud prices at the grocery store led me to try my hand at a small vegetable garden. Nothing too fancy, since we live in an apartment, but things we eat a lot of: lettuce, peppers, basil, tomatoes, and green beans. See, we don't eat just cake around here!
Because I've never done it before, and it's cheaper, I started most of my veggies from seed. When I've planted before, I just bought the half grown plants. So here's what I've got going:
Looseleaf lettuce mixture: Lettuce is well suited to container gardening, and loose leaf lettuce is ready to harvest a little sooner than head lettuce, plus you can pick what you need when you need it. Hopefully, this will mean no more wilted lettuce in the fridge.
Tenderbush garden beans: Two advantages here, the beans grow on a bush rather than a vine. I'm hoping I don't need to stake them. Second, the sead packet says they are stringless, meaning less prep time when they're ready to eat! I figure beans can't be too hard to grow, as they're the classic elementary school science project!
Carnival mix sweet peppers: We eat a lot of peppers, usually green bell peppers. The brightly colored peppers on the seed packet looked so much tastier than the others. Though, I'm pretty sure I'll be going back for some hot peppers. Muy caliente! Short of ghost chili and scorpion peppers (the world's hottest varieties), we like them all.
Mammoth basil: There's nothing better than fresh basil. I grew a small basil plant last year, and thoroughly enjoyed having Billy Basil sit on the windowsill, and grace many a pasta sauce and Thai curry with his presence. Will this be Billy #2 or something else?
I also transplanted Oscar the Onion into a pot with soil. Did you know you can grow green onions on your windowsill in just water? I started Oscar off by putting the root ends that I'd been throwing away for years into a glass of water. Within a few days, we could see new shoots growing. Within a few weeks, he was pretty tall. Now, two months later, he is still alive, and growing faster than we can eat him. As a result, he's pretty droopy and long.
And yes, we name our plants. They're our babies until we have some real ones. Billy Basil, Oscar Onion, and a philodendron named Phil.
Because I've never done it before, and it's cheaper, I started most of my veggies from seed. When I've planted before, I just bought the half grown plants. So here's what I've got going:
 |
| Day 1 |
Looseleaf lettuce mixture: Lettuce is well suited to container gardening, and loose leaf lettuce is ready to harvest a little sooner than head lettuce, plus you can pick what you need when you need it. Hopefully, this will mean no more wilted lettuce in the fridge.
Tenderbush garden beans: Two advantages here, the beans grow on a bush rather than a vine. I'm hoping I don't need to stake them. Second, the sead packet says they are stringless, meaning less prep time when they're ready to eat! I figure beans can't be too hard to grow, as they're the classic elementary school science project!
Carnival mix sweet peppers: We eat a lot of peppers, usually green bell peppers. The brightly colored peppers on the seed packet looked so much tastier than the others. Though, I'm pretty sure I'll be going back for some hot peppers. Muy caliente! Short of ghost chili and scorpion peppers (the world's hottest varieties), we like them all.
Mammoth basil: There's nothing better than fresh basil. I grew a small basil plant last year, and thoroughly enjoyed having Billy Basil sit on the windowsill, and grace many a pasta sauce and Thai curry with his presence. Will this be Billy #2 or something else?
I also transplanted Oscar the Onion into a pot with soil. Did you know you can grow green onions on your windowsill in just water? I started Oscar off by putting the root ends that I'd been throwing away for years into a glass of water. Within a few days, we could see new shoots growing. Within a few weeks, he was pretty tall. Now, two months later, he is still alive, and growing faster than we can eat him. As a result, he's pretty droopy and long.
And yes, we name our plants. They're our babies until we have some real ones. Billy Basil, Oscar Onion, and a philodendron named Phil.
Happy Pi Day!

This recipe really came about in a yin-yang devil-angel kind of way. I tried out a recipe for healthy chocolate muffins that were described as Vita Top knockoffs. I'm all about replicating treats that cost the megabucks. Anyway, the recipe called for egg whites, leaving me with three egg yolks. I really didn't want to throw them away, so started looking for egg yolk only recipes, and remembered my favorite lemon filling recipe uses egg yolks. Problem solved! Egg yolks put to good use, and a rich cheese cake like tart to balance out those healthy, deep chocolate chocolate chip muffins.
Lime curd tart
Lime filling
Recipe adapted from Wilton.com
3/4 cup sugar
2 TBS cornstarch
1/8 tsp salt
3/4 cup cold water
2 egg yolks, slightly beaten
1 TBS lime zest
Juice of 1 lime, about 2 tablespoons
1 TBS butter
1-2 drops green food coloring (optional)
For the record, I used squeeze bottle lime juice. This was an impromptu recipe, so I used what I had.
In a small saucepan, combine sugar, cornstarch and salt. Gradually whisk in the water until dissolved. Whisk in egg yolks, and juice. Cook over medium heat, whisking constantly. The mixture will get foamy, but keep whisking. Cook while whisking, until thick and bubbly. Boil one minute (keep whisking); remove from heat. Stir in butter. Pour into a bowl and cover with plastic wrap. Cool to room temperature, without stirring.
If you use the food coloring, add it while whisking. If you choose not to use it, your filling will be yellow. This recipe gets its color from the egg yolk, and lime juice is clearish. That creamy dreamy green color we know and love is a charade!
Graham cracker crust
1 1/2 cups graham cracker crumbs (this is right at one unopened sleeve of graham crackers)
1/4 cup sugar
1/3 cup melted butter
Combine the crust ingredients in a medium bowl. Stir to combine. Press crumb mixture into a pie plate or tart pan. Using the bottom of a drinking glass helps get it packed down smoothly. Depending on the dish you use, you may have leftover crumbs. Hold on to those for later. Bake your crust at 375 for 8-10 minutes. Set aside and let cool.
Cheesecake filling
8 oz cream cheese softened
1/4 sugar
1 egg
1/4 teaspoon vanilla extract

To finish your tart, stir your lime filling to break up any lumps and loosen and skin that formed on the top. Gently pour/spread the lime filling onto the cooled cheesecake layer. If you had any leftover graham cracker crumbs, you can sprinkle them decoratively over the top.

Cover and put in the fridge. Enjoy while seeing who can recite the most digits of pi.
3.1415926535897932384626433832795028841971693993751058.....
Sunday, March 11, 2012
Amish Friendship Bread
Have you ever heard of Amish Friendship Bread? It's the chain letter of the culinary world. But in this case, if you pass it forward, you friends (those that cook or bake, anyway) will truly love you; if you don't pass it on, no biggie.
In case you don't know, Amish Friendship Bread is a sweet quick bread type bread/cake made from a fermented mixture of milk, sugar, and flour, known as a starter. After minimal tending of the starter for 10 days, you're ready to make the bread. The "tending" can be done in a gallon sized freezer bag, and it only has to be fed once. The other days, you just mush around the bag and leave it on the counter. On day 10, you refresh the starter, divvy it up for sharing, and bake your own batch of bread. The starter recipe can be found here.
The result was am uber delicious, super moist cinnamony cake. I can only describe it as boozy french toast. It has that extra tang that you get with desserts containing alcohol, which I usually don't like. AT ALL! But this, my friends was fantastic.

Better yet, the starter is very versatile! Recipes abound on what to do with the starter. I visited the Friendship Bread Kitchen, where they maintain an archive of at least 190 variations and alternatives, including cookie, waffles, brownies, and Amish Friendship Bread flavor combinations. They also have starter recipes for those on alternative diets (gluten-free, sugar-free, etc.).
I had an extra bag of starter left over and decided to try the brownies. I was worried it would have that tangy flavor, which I didn't think would mesh well with chocolate, but it tasted like a chocolate cake or quick loaf. The texture was definitely more cakey than brownie-ish, but tasty all the same.
For the record, I'm pretty sure the Amish didn't come up with this; at least not as this recipe is written. I wouldn't imagine they'd be using instant pudding mix!
In case you don't know, Amish Friendship Bread is a sweet quick bread type bread/cake made from a fermented mixture of milk, sugar, and flour, known as a starter. After minimal tending of the starter for 10 days, you're ready to make the bread. The "tending" can be done in a gallon sized freezer bag, and it only has to be fed once. The other days, you just mush around the bag and leave it on the counter. On day 10, you refresh the starter, divvy it up for sharing, and bake your own batch of bread. The starter recipe can be found here.
 |
| The starter, around day 6 or so... |
The result was am uber delicious, super moist cinnamony cake. I can only describe it as boozy french toast. It has that extra tang that you get with desserts containing alcohol, which I usually don't like. AT ALL! But this, my friends was fantastic.

 |
| Cinnamon sugar topping |
Better yet, the starter is very versatile! Recipes abound on what to do with the starter. I visited the Friendship Bread Kitchen, where they maintain an archive of at least 190 variations and alternatives, including cookie, waffles, brownies, and Amish Friendship Bread flavor combinations. They also have starter recipes for those on alternative diets (gluten-free, sugar-free, etc.).
I had an extra bag of starter left over and decided to try the brownies. I was worried it would have that tangy flavor, which I didn't think would mesh well with chocolate, but it tasted like a chocolate cake or quick loaf. The texture was definitely more cakey than brownie-ish, but tasty all the same.
 |
| Brownie/Cake using the last of the starter |
For the record, I'm pretty sure the Amish didn't come up with this; at least not as this recipe is written. I wouldn't imagine they'd be using instant pudding mix!
Thursday, March 8, 2012
I Scream, You Scream
Who doesn't scream for ice cream, right? With the early spring we've been having around here lately, ice cream sounded like a nice treat. The Artist and I were at the mall, strolling along, debating whether we wanted cookies or ice cream. My vote for ice cream won, but I decided I didn't want to drop big bucks for only a scoop or two. Besides, homemade sundaes are always better, and you're not limited to what's in those stale looking containers.
And...I had this recipe for chocolate syrup that I wanted to try. I found this recipe (from Small Notebook) via a pin on Pinterest. [Sidenote: I love Pinterest! I find so many things to try that I wouldn't have found on my own, let alone thought of!]
The chocolate syrup was fabulously simple and absolutely delicious. My little pictures don't do it justice. I made one substitution by using Hershey's Special Dark cocoa powder instead of regular cocoa powder.
 |
| Four simple ingredients, plus water! |
 |
 |
| Brownie sundae supreme |
Tuesday, February 28, 2012
Daring Baker's Challenge - Feb. 2012: Quick Bread
Things have been slow around here. School is hard! I feel like I've done plenty of baking, but either it wasn't blog worthy, or didn't take pictures. I do have a couple of yummy things pending, though!
The Daring Bakers’ February 2012 host was – Lis! Lisa stepped in last minute and challenged us to create a quick bread we could call our own. She supplied us with a base recipe and shared some recipes she loves from various websites and encouraged us to build upon them and create new flavor profiles.
I was cool with this month's challenge -- I could do my own thing, and keep the ingredient budget under control. Besides that, quick breads are great! Who doesn't love a good slice of banana bread? But, sorry, no banana bread here. We've been on a smoothie kick around here, so no over ripe bananas. But I did have a single, sad sweet potato staring at me, left over from sometime before Christmas.
I didn't have a recipe for sweet potato bread, but found a recipe for pumpkin bread. I figured that would be closest to what I was looking for, and already had a starting point to balance the measurements of cinnamon and nutmeg.
This was so good! It tasted like sweet potato pie but in a nice dense cakey package.
Sweet Potato Loaf
Adapted from Streaming Gourmet
Makes 1 9x5 loaf
Ingredients:
3/4 c whole wheat flour
1 tsp cinnamon
.5 tsp nutmeg
.25 tsp salt
.5 tsp baking soda
.25 tsp baking powder
1.5 c sugar
.5 c browned butter
2 eggs
1 medium/large sweet potato, roasted and mashed (about 1 cup)
nuts are optional
My modifications: Obviously, I swapped in sweet potato for pumpkin. I halved the recipe and used 2 eggs. I also used all whole wheat flour instead of the all purpose flour. The original recipe called for ground cloves. I only had whole cloves with no way to grind them, so I left them out.
Directions:
1. Preheat oven to 350F. Spray loaf pan with nonstick cooking spray.
2. In medium bowl, combine the dry ingredients.
3. Cream the butter and sugar. Add eggs one at a time until well combined.
4. Add the mashed sweet potato and mix until combined.
5. In batches, add the dry ingredients. Mix just until combined.
6. Pour batter into prepared pan. Bake for 55-60 minutes until cake tester comes out clean.
7. Let cool in the pan for 10-15 minutes. Turn the loaf out onto a cooling rack. Cool completely.
8. Enjoy!
The Daring Bakers’ February 2012 host was – Lis! Lisa stepped in last minute and challenged us to create a quick bread we could call our own. She supplied us with a base recipe and shared some recipes she loves from various websites and encouraged us to build upon them and create new flavor profiles.
I was cool with this month's challenge -- I could do my own thing, and keep the ingredient budget under control. Besides that, quick breads are great! Who doesn't love a good slice of banana bread? But, sorry, no banana bread here. We've been on a smoothie kick around here, so no over ripe bananas. But I did have a single, sad sweet potato staring at me, left over from sometime before Christmas.
I didn't have a recipe for sweet potato bread, but found a recipe for pumpkin bread. I figured that would be closest to what I was looking for, and already had a starting point to balance the measurements of cinnamon and nutmeg.
 |
| It was more orange colored in real life. |
This was so good! It tasted like sweet potato pie but in a nice dense cakey package.
Sweet Potato Loaf
Adapted from Streaming Gourmet
Makes 1 9x5 loaf
Ingredients:
3/4 c whole wheat flour
1 tsp cinnamon
.5 tsp nutmeg
.25 tsp salt
.5 tsp baking soda
.25 tsp baking powder
1.5 c sugar
.5 c browned butter
2 eggs
1 medium/large sweet potato, roasted and mashed (about 1 cup)
nuts are optional
My modifications: Obviously, I swapped in sweet potato for pumpkin. I halved the recipe and used 2 eggs. I also used all whole wheat flour instead of the all purpose flour. The original recipe called for ground cloves. I only had whole cloves with no way to grind them, so I left them out.
Directions:
1. Preheat oven to 350F. Spray loaf pan with nonstick cooking spray.
2. In medium bowl, combine the dry ingredients.
3. Cream the butter and sugar. Add eggs one at a time until well combined.
4. Add the mashed sweet potato and mix until combined.
5. In batches, add the dry ingredients. Mix just until combined.
6. Pour batter into prepared pan. Bake for 55-60 minutes until cake tester comes out clean.
7. Let cool in the pan for 10-15 minutes. Turn the loaf out onto a cooling rack. Cool completely.
8. Enjoy!
Friday, January 27, 2012
Well, Bless Your Biscuits
Happy New Year (since I haven't posted since December)!
This month's Daring Baker Challenge was biscuits. Audax Artifex was our January 2012 Daring Bakers’ host. Aud worked tirelessly to master light and fluffy scones (a/k/a biscuits) to help us create delicious and perfect batches in our own kitchens! Audax Artifex hails from the land down under, and what they call scones are what us Southerners call biscuits.
I was happy to begin the challenge because while I do love biscuits, I've never really been good at making them. So, I made several variations.
Batch 1: I followed the challenge recipe and instructions. The biscuits had a nice texture, but I thought there was something of a weird aftertaste.
Batch 3: Modified soda biscuits. I used the standard recipe and used sour cream and Sprite instead of milk. Better than batch 1, but still not as good as the original soda biscuits.
Batch 5: Whole wheat biscuits -- by the end of the month, I finally ran out of Bisquick! So....back to the original recipe. After measuring out half my flour, I found myself scraping the bag. I had an unopened bag, but decided to go for one last experiment, and use half whole wheat flour. You may be thinking they would be hard and inedible. WRONG. Just as light and fluffy as before, with a nice flavor from whole wheat.
Biscuits
Servings: about eight 2-inch or five 3-inch biscuits
Can be doubled
Ingredients
1 cup all-purpose flour
2 teaspoons baking powder
¼ teaspoon salt
2 tablespoons frozen grated butter
Approximately ½ cup cold milk
Optional 1 tablespoon milk, for glazing the tops of the scones
Directions:
1. Preheat oven to very hot 475°F.
2. Triple sift the dry ingredients into a large bowl.
3. Rub the frozen grated butter into the dry ingredients until it resembles very coarse bread crumbs with some pea-sized pieces if you want flaky scones or until it resembles coarse beach sand if you want tender scones.
4. Add nearly all of the liquid at once into the rubbed-in flour/fat mixture and mix until it just forms a sticky dough (add the remaining liquid if needed). The wetter the dough the lighter the scones (biscuits) will be!
5. Turn the dough out onto a lightly floured board, lightly flour the top of the dough. Knead very gently about 4 or 5 times (do not press too firmly) the dough until it is smooth. To achieve a layered effect in your scones knead very gently once (do not press too firmly) then fold and turn the kneaded dough about 3 or 4 times until the dough has formed a smooth texture. (Use a floured plastic scraper to help you knead and/or fold and turn the dough if you wish.)
6. Pat or roll out the dough into a 6 inch by 4 inch rectangle by about ¾ inch thick. Using a well-floured 2-inch biscuit cutter, cut out without twisting six 2-inch rounds, gently reform the scraps into another ¾ inch and cut two more scones. Or use a well-floured sharp knife to form squares or wedges as you desire.
7. Place the rounds just touching on a baking dish if you wish to have soft-sided scones or place the rounds spaced widely apart on the baking dish if you wish to have crisp-sided scones. Glaze the tops with milk if you want a golden colour on your scones or lightly flour if you want a more traditional look to your scones.
8. Bake in the preheated very hot oven for about 10 minutes (check at 8 minutes since home ovens at these high temperatures are very unreliable) until the scones are well risen and are lightly coloured on the tops. The scones are ready when the sides are set.
9. Immediately place onto cooling rack to stop the cooking process, serve while still warm.
7-Up Biscuits (Yields 9 biscuits)
2 cups Bisquick
1/2 cup sour cream
1/2 cup lemon lime soda (Sprite, 7-up, etc).
1/2 stick butter
1. Preheat oven to 450 degrees.
2. Stir sour cream into baking mix with a fork.
3. Add soda to bowl and stir until just mixed. Do not overmix! Dough will be very wet and sticky. Don't add more flour.
3. Turn out onto floured work surface and knead a few times with floured hands.
4. Use a well floured biscuit cutter to cut out. You should get about 9 biscuits.
5. Melt butter in 8" square baking pan.
6. Place biscuits in pan and bake for 8-10 minutes.
Notes: If you'd like, you can skip the kneading in step 3 and make drop biscuits. OR, dump it all into your buttered pan and it'll be like cake. That worked well for the cinnamon raising biscuits.
Cinnamon raisin variation: Stir in a cup or so of raisins and a teaspoon of cinnamon before kneading. Top with a quick vanilla glaze: Mix togerther 1 tablespoon softened butter or margarine, with about 1/2 cup of confectioners sugar to make a smooth frosting like mixture. Stir in a teaspoon or two of milk to thin to a glaze. Spread the glaze over warm but not hot biscuits.
Cheese variation: Add a good sized handful of cheese and a stalks worth of chopped green onions before kneading. You can also add a little garlic powder.
Enjoy! See you next time.
This month's Daring Baker Challenge was biscuits. Audax Artifex was our January 2012 Daring Bakers’ host. Aud worked tirelessly to master light and fluffy scones (a/k/a biscuits) to help us create delicious and perfect batches in our own kitchens! Audax Artifex hails from the land down under, and what they call scones are what us Southerners call biscuits.
I was happy to begin the challenge because while I do love biscuits, I've never really been good at making them. So, I made several variations.
 |
| Yes, I could have cut these a little smaller... |
 |
| Inside view of a fresh baked biscuit |
Batch 2: Cinnamon raisin biscuits -- based on "soda biscuits" -- A while back, I found a recipe on Pinterest described as tasting like biscuits from Popeye's fried chicken. That was the hook. Reading the ingredients, I was curious how Bisquick, 7-Up (or Sprite) and sour cream played out in a biscuit. Consider that the line and the sinker. I made them for the first time in December, and they were absolutely the best biscuits I'd ever had. Light, fluffy, moist, buttery...MMMM!! Adding some raisins, a pinch of cinnamon, and a vanilla glaze turned breakfast biscuits into dessert. These were like what you'd get at Hardee's or Bojangles (if you're in the South), but better.
 |
| I know you don't actually SEE any raisins in this picture, but they're in there. |
Batch 3: Modified soda biscuits. I used the standard recipe and used sour cream and Sprite instead of milk. Better than batch 1, but still not as good as the original soda biscuits.
 |
| See what a litte sour cream can do? |
Batch 4: Cheddar biscuits -- These obviously were meant to imitate what you'd get at a certain seafood restaurant chain. But these didn't spend any time under a heat lamp waiting for your server to bring them out. They didn't spend much time on the table, either!
Batch 5: Whole wheat biscuits -- by the end of the month, I finally ran out of Bisquick! So....back to the original recipe. After measuring out half my flour, I found myself scraping the bag. I had an unopened bag, but decided to go for one last experiment, and use half whole wheat flour. You may be thinking they would be hard and inedible. WRONG. Just as light and fluffy as before, with a nice flavor from whole wheat.
Biscuits
Servings: about eight 2-inch or five 3-inch biscuits
Can be doubled
Ingredients
1 cup all-purpose flour
2 teaspoons baking powder
¼ teaspoon salt
2 tablespoons frozen grated butter
Approximately ½ cup cold milk
Optional 1 tablespoon milk, for glazing the tops of the scones
Directions:
1. Preheat oven to very hot 475°F.
2. Triple sift the dry ingredients into a large bowl.
3. Rub the frozen grated butter into the dry ingredients until it resembles very coarse bread crumbs with some pea-sized pieces if you want flaky scones or until it resembles coarse beach sand if you want tender scones.
4. Add nearly all of the liquid at once into the rubbed-in flour/fat mixture and mix until it just forms a sticky dough (add the remaining liquid if needed). The wetter the dough the lighter the scones (biscuits) will be!
5. Turn the dough out onto a lightly floured board, lightly flour the top of the dough. Knead very gently about 4 or 5 times (do not press too firmly) the dough until it is smooth. To achieve a layered effect in your scones knead very gently once (do not press too firmly) then fold and turn the kneaded dough about 3 or 4 times until the dough has formed a smooth texture. (Use a floured plastic scraper to help you knead and/or fold and turn the dough if you wish.)
6. Pat or roll out the dough into a 6 inch by 4 inch rectangle by about ¾ inch thick. Using a well-floured 2-inch biscuit cutter, cut out without twisting six 2-inch rounds, gently reform the scraps into another ¾ inch and cut two more scones. Or use a well-floured sharp knife to form squares or wedges as you desire.
7. Place the rounds just touching on a baking dish if you wish to have soft-sided scones or place the rounds spaced widely apart on the baking dish if you wish to have crisp-sided scones. Glaze the tops with milk if you want a golden colour on your scones or lightly flour if you want a more traditional look to your scones.
8. Bake in the preheated very hot oven for about 10 minutes (check at 8 minutes since home ovens at these high temperatures are very unreliable) until the scones are well risen and are lightly coloured on the tops. The scones are ready when the sides are set.
9. Immediately place onto cooling rack to stop the cooking process, serve while still warm.
7-Up Biscuits (Yields 9 biscuits)
2 cups Bisquick
1/2 cup sour cream
1/2 cup lemon lime soda (Sprite, 7-up, etc).
1/2 stick butter
1. Preheat oven to 450 degrees.
2. Stir sour cream into baking mix with a fork.
3. Add soda to bowl and stir until just mixed. Do not overmix! Dough will be very wet and sticky. Don't add more flour.
3. Turn out onto floured work surface and knead a few times with floured hands.
4. Use a well floured biscuit cutter to cut out. You should get about 9 biscuits.
5. Melt butter in 8" square baking pan.
6. Place biscuits in pan and bake for 8-10 minutes.
Notes: If you'd like, you can skip the kneading in step 3 and make drop biscuits. OR, dump it all into your buttered pan and it'll be like cake. That worked well for the cinnamon raising biscuits.
Cinnamon raisin variation: Stir in a cup or so of raisins and a teaspoon of cinnamon before kneading. Top with a quick vanilla glaze: Mix togerther 1 tablespoon softened butter or margarine, with about 1/2 cup of confectioners sugar to make a smooth frosting like mixture. Stir in a teaspoon or two of milk to thin to a glaze. Spread the glaze over warm but not hot biscuits.
Cheese variation: Add a good sized handful of cheese and a stalks worth of chopped green onions before kneading. You can also add a little garlic powder.
Enjoy! See you next time.
Tuesday, December 27, 2011
Daring Bakers - December 2011: Sourdough Bread
 |
| Courtesy of King Arthur Flour |
Our Daring Bakers Host for December 2011 was Jessica of My Recipe Project and she showed us how fun it is to create Sour Dough bread in our own kitchens! She provided us with Sour Dough recipes from Bread Matters by AndrewWhitley as well as delicious recipes to use our Sour Dough bread in from Tonia George’s Things on Toast and Canteen’s Great British Food!
Let me first say that I love sourdough bread. Anytime I see a grilled toasty sandwich on sourdough, I'll take it! As for the sourdough making process, I can't say it was an enjoyable process. Even the science nerd in me was kind of grossed out.
unlike regular bread, sourdough bread is made from a starter, and has no yeast. No yeast? Well, you ask, how does it rise? The starter is a mass of fermented water and flour. The recipe Jessica provided consisted of flour and water left to ferment in a covered container for several days. Periodically, you feed the starter with more flour and water.
All starter well in the beginning, I could see it starting to bubble away on the counter, and I dutifully fed it each day. However, by day 4, it had stopped bubbling, and a layer of greyish liquid had formed on top. Not sure what to do, I proceeded with the recipe, hoping it would still do something. After the final feeding/refreshing, I was ready to bake. It looked like the thing that ate Manhattan, and stank to high heaven! But, reading other DBers' posting who said that it would be an extremely wet and loose dough, I kept going. I don't have any pictures of the blob because it would have dripped off the counter onto the flour if I'd tried to take pictures.
I waited for it to proof and rise. And waited...and waited... and waited. Nothing. I hoped it would have some oven spring. Nope. My final project was flat, dense, greyish in color, and not at all edible.
Monday, October 31, 2011
Happy Halloween!

When you were a kid, what candy in the trick or treat bag made your day? For me, it was chocolate, of course. And it couldn't be just any chocolate, either. It had to be the good stuff - the name brand chocolate. You name it..Snickers, Reese's, and of course, Butterfinger.
We don't have any trick or treaters of our own yet, and we're the type to eat any candy we buy for the trick or treaters a week before Halloween. So,...we typically don't buy any (until after Halloween, that is). But, the past few weeks, I've been seeing pins on Pinterest for homemade butterfinger candy bars. One recipe has lots of ingredients, and the other so simple you don't believe it could possibly work.
The science geek in me really wanted to see how candy corn plus peanut butter equaled butterfinger bars! But, yes, ladies and gentlemen, it works. And, if I do say so myself, the homemade version is better than the original. (But just as bad for you, LOL)
 |
| The "real" butterfinger is on the right. Doppelganger on the left. |
16 oz candy corn
16 oz peanut butter
Chocolate coating (Candy Melts, Chocolate Bark, whatever you please)
 Microwave the candy corn and peanut butter in a glass bowl until it starts to melt. Stir. Continue melting and stirring. The candy corn will not melt as easily as the peanut butter, but you shouldn't need more than a minute and a half of microwaving total. Keep stirring until the candy corn is completely melted and combined with the peanut butter. The mixture will start out pretty grainy, and you'll think you're going to have to toss your bowl out. But, pretty soon, it comes together into a smooth ball, and very little candy sticks to the bowl. You can now press the mixture into a pan or candy molds to set, or scoop them into bonbons. Let cool completely before covering in your melted candy coating.
I used a 5 oz bag of candy corn and about a half cup of peanut butter and got 5 "fun size" candy bars plus three small bonbons. The homemade butterfingers are the size that fun size candy bars used to be when I was a kid (Don't you think they've gotten smaller?), had a stronger flavor, but had a softer texture. You still get the crunchiness, but they don't get stuck in your teeth as much as the original.

Thursday, October 27, 2011
Daring Baker October 2011 - Povitica
Before I start, this wonderful sweet bread, spelled povitica is pronounced po-vi-teet-sa.

To activate the Yeast:
½ Teaspoon (2½ ml/2¼ gm) Sugar
¼ Teaspoon (1¼ ml/¾ gm) All-Purpose (Plain) Flour
2 Tablespoons (30 ml) Warm Water
1½ Teaspoons (7½ ml/3½ gm/0.125 oz/½ sachet) Dry Yeast
1. In a small bowl, stir 2 teaspoons sugar, 1 teaspoon flour, and the yeast into ½ cup warm water and cover with plastic wrap.
2. Allow to stand for 5 minutes
Dough:
½ Cup (120 ml) Whole Milk
3 Tablespoons (45 ml/43 gm/1½ oz) Sugar
¾ Teaspoon (3¾ ml/9 gm/0.17 oz) Table Salt
1 Large Egg
1 tablespoon (30 ml/30 gm/¼ stick/1 oz) Unsalted Butter, melted
2 cups (480 ml/280 gm/10 oz/0.62 lb) All-Purpose Flour, measure first then sift, divided
To Make the Dough:
3. In a medium saucepan, heat the milk up to just below boiling (about 180°F/82°C), stirring constantly so that a film does not form on the top of the milk. You want it hot enough to scald you, but not boiling. Allow to cool slightly, until it is about 110°F/43°C.
4. In a large bowl, mix the scalded milk, ¾ cup (180 gm/170 gm/6 oz) sugar, and the salt until combined.
5. Add the beaten eggs, yeast mixture, melted butter, and 2 cups (480 ml/280 gm/10 oz) of flour.
6. Blend thoroughly and slowly add remaining flour, mixing well until the dough starts to clean the bowl.
7. Turn dough out onto floured surface and knead, gradually adding flour a little at a time, until smooth and does not stick.
8. Divide the dough into 4 equal pieces (they will each weight about 1.25 pounds/565 grams)
9. Place dough in 4 lightly oiled bowls, cover loosely with a layer of plastic wrap and then a kitchen towel and let rise an hour and a half in a warm place, until doubled in size.
Filling Ingredients (enough filling for one loaf)
1¾ Cups (420 ml/280 gm/10 oz) Ground English Walnuts
¼ Cup (60 ml) Whole Milk
¼ Cup (60 ml/58 gm/½ stick/2 oz) Unsalted Butter
1 Egg Yolk From A Large Egg, Beaten
¼ Teaspoon (1¼ ml) Pure Vanilla Extract
½ Cup (120 ml/115 gm/4 oz) Sugar
¼ Teaspoon (1¼ ml/1 gm) Unsweetened Cocoa Powder
¼ Teaspoon (1¼ ml/¾ gm) Cinnamon
To Make the Filling
10. In a large bowl mix together the ground walnuts, sugar, cinnamon and cocoa.
11. Heat the milk and butter to boiling.
12. Pour the liquid over the nut/sugar mixture.
13. Add the eggs and vanilla and mix thoroughly.
14. Allow to stand at room temperature until ready to be spread on the dough.
15. If the mixture thickens, add a small amount of warm milk.
To Roll and Assemble the Dough:
16. Spread a clean sheet or cloth over your entire table so that it is covered.
17. Sprinkle with a couple of tablespoons to a handful of flour (use flour sparingly)
18. Place the dough on the sheet and roll the dough out with a rolling pin, starting in the middle and working your way out, until it measures roughly 10-12 inches (25½ cm by 30½ cm) in diameter.
19. Spoon 1 to 1.5 teaspoons (5ml to 7 ½ ml/4 gm to 7 gm) of melted butter on top.
20. Using the tops of your hands, stretch dough out from the center until the dough is thin and uniformly opaque. You can also use your rolling pin, if you prefer.
21. As you work, continually pick up the dough from the table, not only to help in stretching it out, but also to make sure that it isn’t sticking.
22. When you think it the dough is thin enough, try to get it a little thinner. It should be so thin that you can see the color and perhaps the pattern of the sheet underneath.
23. Spoon filling (see below for recipe) evenly over dough until covered.
24. Lift the edge of the cloth and gently roll the dough like a jelly roll.
25. Once the dough is rolled up into a rope, gently lift it up and place it into a greased loaf pan in the shape of a “U”, with the ends meeting in the middle. You want to coil the dough around itself, as this will give the dough its characteristic look when sliced.
27. Brush the top of loaf with a mixture of ½ cup (120 ml) of cold STRONG coffee and 2 tablespoons (30ml/28 gm/1 oz) of sugar. If you prefer, you can also use egg whites in place of this.
28. Cover pan lightly will plastic wrap and allow to rest for approximately 15 minutes.
29. Preheat oven to moderate 350°F/180°C/gas mark 4.
30. Remove plastic wrap from dough and place into the preheated oven and bake for approximately 15 minutes.
31. Turn down the oven temperature to slow 300°F/150°C/gas mark 2 and bake for an additional 45 minutes, or until done.
32. Remove bread from oven and brush with melted butter.
33. Check the bread at 30 minutes to ensure that the bread is not getting too brown. You may cover the loaves with a sheet of aluminum foil if you need to.
34. Remove from the oven and allow to cool on a wire rack for 20-30 minutes, still in the bread pan. Remember, the bread weighs about 2.5 and it needs to be able to hold its own weight, which is difficult when still warm and fresh out of the oven. Allowing it to cool in the pan helps the loaf to hold its shape.
35. It is recommended that the best way to cut Povitica loaves into slices is by turning the loaf upside down and slicing with a serrated knife.

The Daring Baker’s October 2011 challenge was Povitica, hosted by Jenni of The Gingered Whisk. Povitica is a traditional Eastern European Dessert Bread that is as lovely to look at as it is to eat!
And, best of all, not too hard to make. And once you taste the povitica, you have to learn t make it. These bad boys go for $27 apiece online! The hardest part was making and rolling out the dough, and this one was pretty easy to work with. And pretty tasty to eat. This was one of those things you have to sneak a taste of everytime you pass through the kitchen. It didn't make it through the weekend.
Here's the recipe that Jenni put together. NOTE: The amounts referred to in the instructions do not match the recipe amounts. Jenni's original recipe made FOUR loaves!
Povitica (Makes one loaf 1.25 lbs/565 grams)
To activate the Yeast:
½ Teaspoon (2½ ml/2¼ gm) Sugar
¼ Teaspoon (1¼ ml/¾ gm) All-Purpose (Plain) Flour
2 Tablespoons (30 ml) Warm Water
1½ Teaspoons (7½ ml/3½ gm/0.125 oz/½ sachet) Dry Yeast
1. In a small bowl, stir 2 teaspoons sugar, 1 teaspoon flour, and the yeast into ½ cup warm water and cover with plastic wrap.
2. Allow to stand for 5 minutes
Dough:
½ Cup (120 ml) Whole Milk
3 Tablespoons (45 ml/43 gm/1½ oz) Sugar
¾ Teaspoon (3¾ ml/9 gm/0.17 oz) Table Salt
1 Large Egg
1 tablespoon (30 ml/30 gm/¼ stick/1 oz) Unsalted Butter, melted
2 cups (480 ml/280 gm/10 oz/0.62 lb) All-Purpose Flour, measure first then sift, divided
To Make the Dough:
3. In a medium saucepan, heat the milk up to just below boiling (about 180°F/82°C), stirring constantly so that a film does not form on the top of the milk. You want it hot enough to scald you, but not boiling. Allow to cool slightly, until it is about 110°F/43°C.
4. In a large bowl, mix the scalded milk, ¾ cup (180 gm/170 gm/6 oz) sugar, and the salt until combined.
5. Add the beaten eggs, yeast mixture, melted butter, and 2 cups (480 ml/280 gm/10 oz) of flour.
6. Blend thoroughly and slowly add remaining flour, mixing well until the dough starts to clean the bowl.
7. Turn dough out onto floured surface and knead, gradually adding flour a little at a time, until smooth and does not stick.
8. Divide the dough into 4 equal pieces (they will each weight about 1.25 pounds/565 grams)
9. Place dough in 4 lightly oiled bowls, cover loosely with a layer of plastic wrap and then a kitchen towel and let rise an hour and a half in a warm place, until doubled in size.
Filling Ingredients (enough filling for one loaf)
1¾ Cups (420 ml/280 gm/10 oz) Ground English Walnuts
¼ Cup (60 ml) Whole Milk
¼ Cup (60 ml/58 gm/½ stick/2 oz) Unsalted Butter
1 Egg Yolk From A Large Egg, Beaten
¼ Teaspoon (1¼ ml) Pure Vanilla Extract
½ Cup (120 ml/115 gm/4 oz) Sugar
¼ Teaspoon (1¼ ml/1 gm) Unsweetened Cocoa Powder
¼ Teaspoon (1¼ ml/¾ gm) Cinnamon
To Make the Filling
10. In a large bowl mix together the ground walnuts, sugar, cinnamon and cocoa.
11. Heat the milk and butter to boiling.
12. Pour the liquid over the nut/sugar mixture.
13. Add the eggs and vanilla and mix thoroughly.
14. Allow to stand at room temperature until ready to be spread on the dough.
15. If the mixture thickens, add a small amount of warm milk.
To Roll and Assemble the Dough:
16. Spread a clean sheet or cloth over your entire table so that it is covered.
17. Sprinkle with a couple of tablespoons to a handful of flour (use flour sparingly)
18. Place the dough on the sheet and roll the dough out with a rolling pin, starting in the middle and working your way out, until it measures roughly 10-12 inches (25½ cm by 30½ cm) in diameter.
19. Spoon 1 to 1.5 teaspoons (5ml to 7 ½ ml/4 gm to 7 gm) of melted butter on top.
20. Using the tops of your hands, stretch dough out from the center until the dough is thin and uniformly opaque. You can also use your rolling pin, if you prefer.
21. As you work, continually pick up the dough from the table, not only to help in stretching it out, but also to make sure that it isn’t sticking.
22. When you think it the dough is thin enough, try to get it a little thinner. It should be so thin that you can see the color and perhaps the pattern of the sheet underneath.
23. Spoon filling (see below for recipe) evenly over dough until covered.
24. Lift the edge of the cloth and gently roll the dough like a jelly roll.
25. Once the dough is rolled up into a rope, gently lift it up and place it into a greased loaf pan in the shape of a “U”, with the ends meeting in the middle. You want to coil the dough around itself, as this will give the dough its characteristic look when sliced.
27. Brush the top of loaf with a mixture of ½ cup (120 ml) of cold STRONG coffee and 2 tablespoons (30ml/28 gm/1 oz) of sugar. If you prefer, you can also use egg whites in place of this.
28. Cover pan lightly will plastic wrap and allow to rest for approximately 15 minutes.
29. Preheat oven to moderate 350°F/180°C/gas mark 4.
30. Remove plastic wrap from dough and place into the preheated oven and bake for approximately 15 minutes.
31. Turn down the oven temperature to slow 300°F/150°C/gas mark 2 and bake for an additional 45 minutes, or until done.
32. Remove bread from oven and brush with melted butter.
33. Check the bread at 30 minutes to ensure that the bread is not getting too brown. You may cover the loaves with a sheet of aluminum foil if you need to.
34. Remove from the oven and allow to cool on a wire rack for 20-30 minutes, still in the bread pan. Remember, the bread weighs about 2.5 and it needs to be able to hold its own weight, which is difficult when still warm and fresh out of the oven. Allowing it to cool in the pan helps the loaf to hold its shape.
35. It is recommended that the best way to cut Povitica loaves into slices is by turning the loaf upside down and slicing with a serrated knife.
 |
| The money shot! |
Sunday, October 23, 2011
Taste of Atlanta 2011
Have you been to the Taste of Atlanta? If not, you need to go next year!
The Taste of Atlanta is our favorite fall food festival. It's a weekend full of fantastic food -- more than you can even think about eating in a single afternoon. This year was the tenth anniversary, and over 80 restaurants were featured. With your general admission ticket, you receive 10 "taste tickets" which you can redeem at the different booths for samples of their yum yum yummies. To get the most of our taste tickets, the Artist and I always go in with a plan:
1. Scope out the entire festival. Who's got the good stuff, and how many tickets is it?
This step is crucial, it's way to easy to use up all of your tickets before you even get through the first block! I mean, really! Sublime Doughnuts and Jim 'n Nick's BBQ met us at the entrance gate!
2. Have a tasting strategy.
We usually share things that are more than a bite or two. That way, we don't both fork over 3 or 4 tickets for the same thing. Also, it's hard to do, but don't load up on desserts first. I speak this one from experience. Last year, I was stuffed...uncomfortably so, and way before I was ready to go home!
3. Plan to buy more taste tickets!
Because really, 10 tickets is not going to be enough

Even going in with a plan, there's always something you want to taste but don't. Ri Ra's line for fish and chips stayed a block long for the entire afternoon! I wanted to try the arroncini, but 1 tiny rice ball wasn't really worth 2 tickets, was it?
The Taste of Atlanta is our favorite fall food festival. It's a weekend full of fantastic food -- more than you can even think about eating in a single afternoon. This year was the tenth anniversary, and over 80 restaurants were featured. With your general admission ticket, you receive 10 "taste tickets" which you can redeem at the different booths for samples of their yum yum yummies. To get the most of our taste tickets, the Artist and I always go in with a plan:
1. Scope out the entire festival. Who's got the good stuff, and how many tickets is it?
This step is crucial, it's way to easy to use up all of your tickets before you even get through the first block! I mean, really! Sublime Doughnuts and Jim 'n Nick's BBQ met us at the entrance gate!
2. Have a tasting strategy.
We usually share things that are more than a bite or two. That way, we don't both fork over 3 or 4 tickets for the same thing. Also, it's hard to do, but don't load up on desserts first. I speak this one from experience. Last year, I was stuffed...uncomfortably so, and way before I was ready to go home!
3. Plan to buy more taste tickets!
Because really, 10 tickets is not going to be enough
 |
| Seafood Bisque |
 |
| Cheesesteak |
 |
| Orange Dream Doughnut |
 |
| Soft Pretzel w/Beer Cheese Dip |
 |
| Lamb Slider |
 |
| Banh Mi |
 |
| Mississippi Delta Tamale |
 |
| Caramel Apple Bread Pudding |

 |
| Orange Kissed Frozen Yogurt |
 |
| Lemon Pepper Wings and Fries |
Sunday, September 11, 2011
Goodbye Summer, Hello Fall!
It's that time of year....it's still hot as Hades, but I still am optimistically believing that I can "feel" fall in the air. It seems this year that Labor Day was literally the switch for fall, it's been in the low 70s all week since, while just two days before Labor Day, it was 95!
As the final hurrah to summer, I made ice cream. Sort of. As much as ice cream can be made without an ice cream maker. And as much as ice cream can be made in a plastic freezer bag. I've seen this several times before, most often in family oriented magazines under "Things to Keep the Kids Busy". No kids here, just a science nerd and foodie who is still fascinated by the butter we made in a jar in the 2nd grade. I followed this recipe from 2 little hooligans.

It turned out to be a runny soft-servish consistency. At this point, ice cream maker ice cream would also be soft and you'd put it in the freezer to finish up. I put this in the freezer and it got too hard and lost any creaminess it started out with. Not bad in a pinch, but the stuff from the store works for me.

The same day, to usher in fall, I made white chocolate pumpkin scones. I'm usually not a scone girl. For me, I classify them as snacks/dessert, and my baked snacks/dessert should be sweet. All of the scones I've had have been of the Starbucks/Panera variety, which means dry triangular biscuits with something either in them or on them. These however, were AWESOME. Rich, buttery, flaky. I also was finally able to understand what the descriptor "tender" means in relation to baked goods.
I doubled the recipe from Small Batch Baking for Chocolate Lovers, and skipped the glaze. I only skipped the glaze because I only had a handful of white chips, and they went inside the scones.

Changing gears, today is the 10th anniversary of the September 11 attacks. Do you remember where you were? How has your life changed?
Tuesday, June 28, 2011
Take-out Fake-out: Red Thai Curry

Here's a first at the Great Cakescapade: A RECIPE! And not only a recipe, but a take-out favorite, Thai Curry. I like red curry, but would never in a million years have thought it would be so easy to make at home. A few weeks ago, I was visiting my mom, and snatched a couple of magazines to read on the plane back home. Fine Cooking had a spread on DIY Thai curry, including a matrix to mix and match your own custom curry that can be found here.
This recipe is totally easy and doable, with very little in the way of 'odd' ingredients. I think I spent more time chopping than cooking.
Red Chicken Curry (adapted from Fine Cooking Magazine)
*Curry Base
14 oz can coconut milk
1/4 cup red curry paste
1 cup chicken broth
*Aromatics
3 slices of ginger
1 stalk lemongrass, cut into 4-inch pieces and bruised (I hit it with a meat mallet a couple times)
*Protein
1 lb. boneless, skinless chicken breast, thinly sliced
*Other stuff
2 TBS brown sugar
1 tsp fish sauce (I realized at the last minute we didn't have any. I left it out completely and couldn't tell you it was missing)
*Veggies
3 cups chopped vegetables : I used carrots, onions, bell peppers, and sugar snap peas
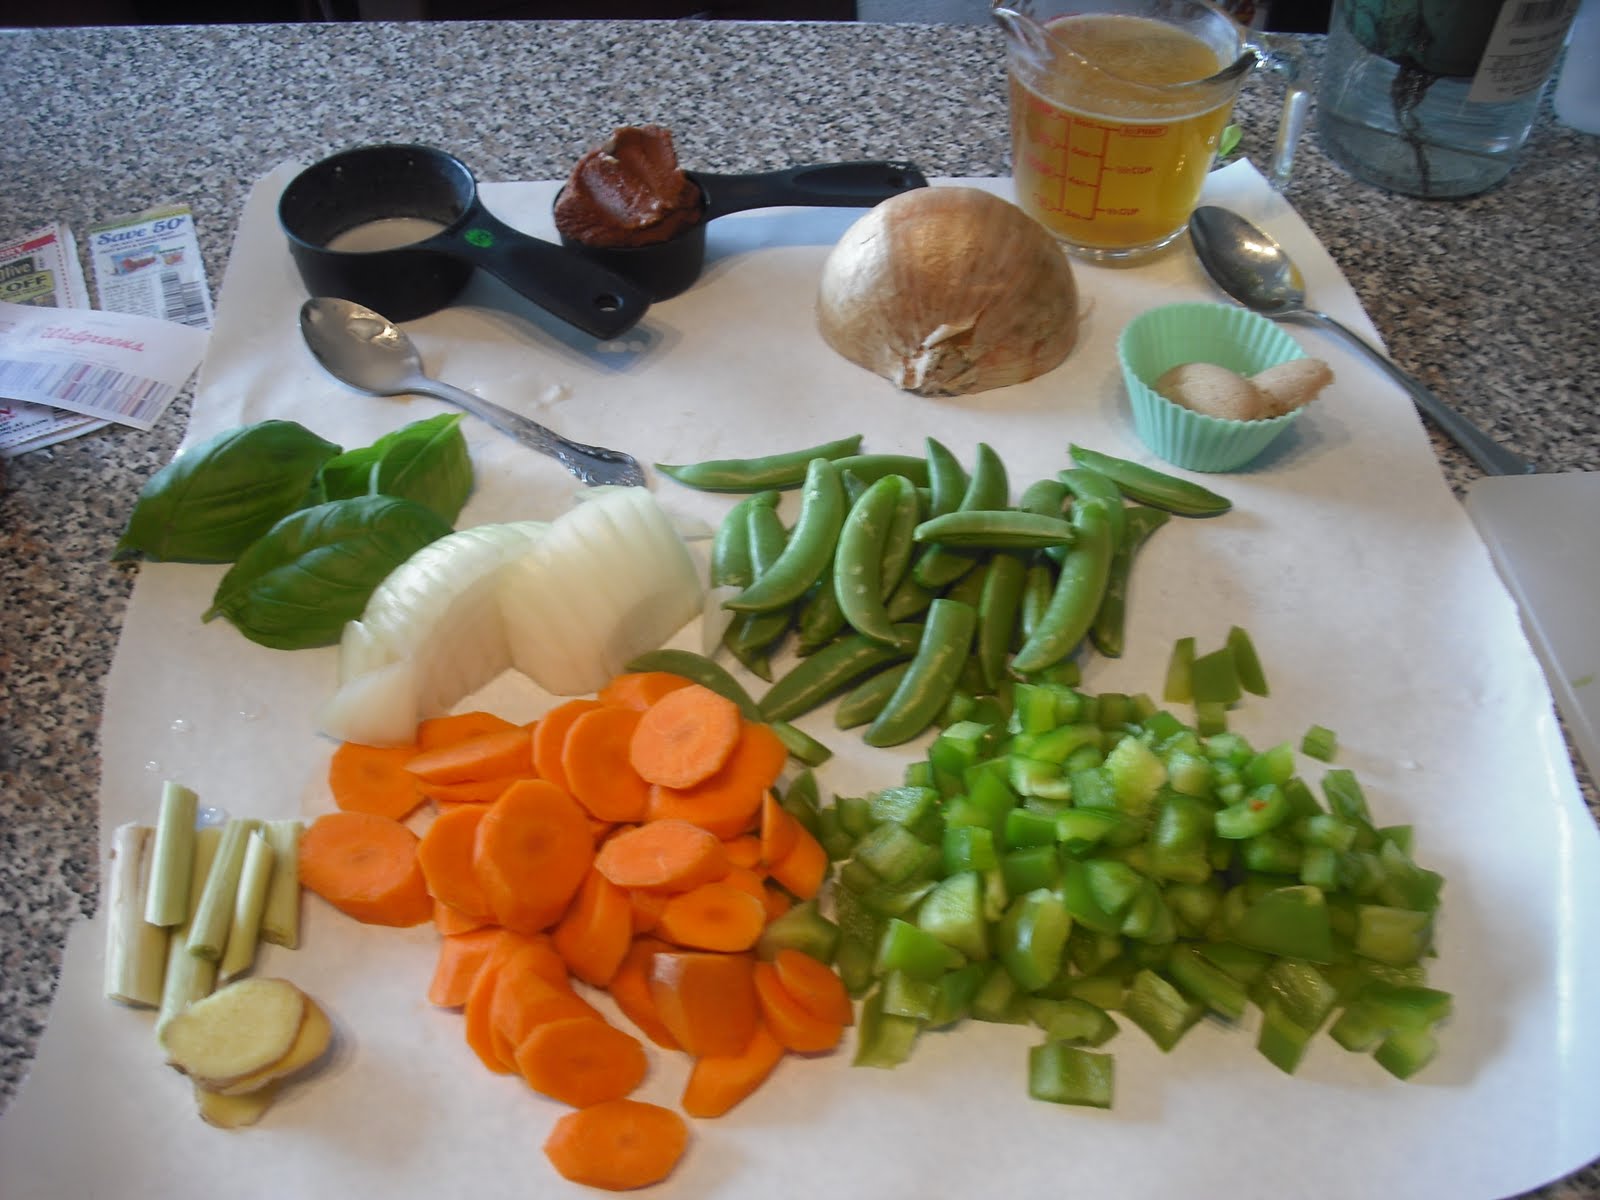
To make the curry base, simmer 1/2 a cup of the coconut milk until it is thickened and reduced by half. Whisk in the curry paste, cook 1 minute, then whisk in the remaining coconut milk and chicken broth.

Add the ginger, lemongrass, and brown sugar. Stir to dissolve the brown sugar, then start adding the remaining ingredients according to cooking time. The chicken went in first, then the carrots, peppers, and onion. Snap peas went in last, as they don't take too long. Let the whole wok simmer until everything is done! Serve over rice, and supper is ready.
 The Fine Cooking Magazine matrix is easy to follow and really lets you realize how customizable the recipe is. The Artist, who had never before had Thai curry, really enjoyed it, and so did I.
 Monday, June 27, 2011
Opa! Daring Baker Challenge - June 2011
 Erica of Erica’s Edibles was our host for the Daring Baker’s June challenge. Erica challenged us to be truly DARING by making homemade phyllo dough and then to use that homemade dough to make Baklava.
Homemade phyllo? Now, that's a challenge. Challenge number one was when the recipe said to knead by hand for 20 minutes (the alternative when you don't own a stand mixer). I was resourceful and had my bread machine do the kneading. The dough was a bit sticky, but was wonderfully smooth and silky -- much nicer than it looks when I make actual bread!
After letting the dough rest for a couple of hours, I was ready to rock and roll. I thought getting the phyllo sheets paper thin would be no big deal -- I roll fondant and gumpaste that thin for flowers. This just was not the same. It seemed at some points that, while the dough didn't seem thin enough, the rolling pin wasn't doing anything, and I had to put my weight into it. As you can see in the picture below, I need to invest in a cute, frilly apron.
Eventually, I was tired of rolling phyllo dough. But finally, I had about 12 thin enough sheets of phyllo, which I was able to cut down to 18 sheets the size of my small baking dish. After the dough rolling, assembling the baklava was simple: layers of phyllo brushed with melted butter, alternating with layers of finely chopped nuts and cinnamon.
 I knew going into the challenge that I was not a big baklava fan. I think if I made it again, I would go with my usual store bought whole wheat phyllo, and use something other than honey in the soaking syrup.
Thanks for the challenge (and upper body workout), Erica! Stay tuned for July's challenge.
Thursday, June 9, 2011
Not your regular graduation cake

My baby sister's all grown up! This past weekend, L graduated from high school. I was 13 when she was born, and still remember life before she was around. I hadn't had the opportunity to share the perks of my cake baking hobby with my mom and sister, and decided to whip up something for the occasion.
Harder than it sounds because L is a notoriously picky eater.
Me:What kind of cake do you want?
Crickets...It took her forever to decide.
L:White cake with vanilla frosting.
Seriously? White on white?
L: Well, you can color the frosting.
Me: Alrighty, then. What kind of design do you want?
L is a budding artist, and of course, had to come up with something extreme. This is the description she sent via Facebook:
"Can you just make me a BAD-ASS manticore cake with vicious teeth in a creepy smile, yellow cat-like eyes with black pupils, a dirty blond main thats really messy and flops around, human-like paws, blueish purple hind-quarters with digit grade back legs, deep blus scorpion tail dripping poison, and lightning bolt stripes of electric blue. Oh, and can you make him a hipster?"
Me: WTF???
So...yeah....what I decided to do was merge our respective hobbies in the middle. We split a box of fondant and each created a manticore (which, BTW, is a chimera like creature). Best manticore would go on the cake. And MINE WENT ON THE CAKE!
And quite the tasty cake, too. An ice cream cake! Chocolate cake (I talked her into living a little), cookies and creme ice cream, and white frosting. I need to plan the ice cream cake process a little better; it started to melt and wouldn't firm up without an overnight freeze. But, I think it turned out pretty good, despite the drips and bulges, considering I frosted it with a plastic knife! The plastic knife was because I wasn't sure if my cake spatulas would make it past the TSA screeners.
Congratulations, little sister!
Subscribe to:
Posts (Atom)